Setting up and managing collaborative activities and group work in Moodle involves several steps. Moodle provides various tools to facilitate group collaboration and communication. Here’s a step-by-step guide:
1. Create a Course (if not already created)
- Go to your Moodle Dashboard: Log in to Moodle and go to the “Course Management” section.
- Create a New Course: Click on “Add a New Course” and fill in the necessary course details.
2. Enable Group Work in the Course Settings
To facilitate collaborative activities, you first need to enable group settings in the course.
- Turn Editing On: On your course page, click the “Turn editing on” button.
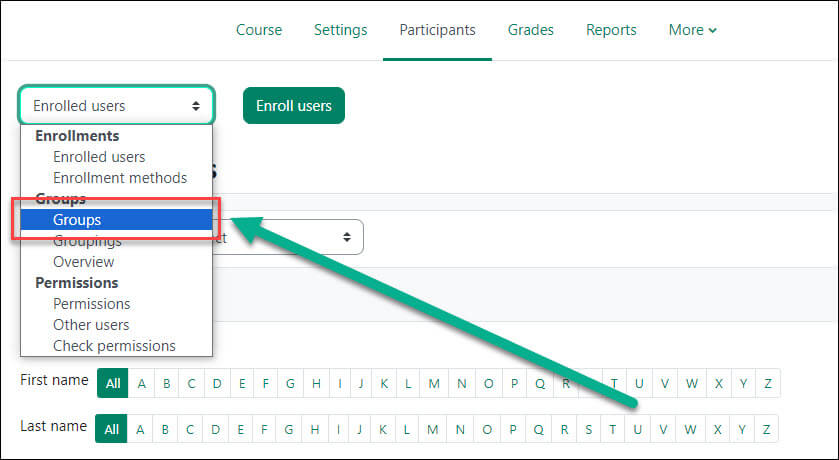
- Access Course Settings: Go to
Course administration > Users > Groups. - Enable Groups: In the group settings, make sure that groups are enabled. You can choose from three types of group modes:
- No groups: This is for courses where students work individually.
- Separate groups: Each group cannot see other groups’ activities and materials.
- Visible groups: Students can see other groups’ activities, but they work within their own groups.
3. Create Groups
Groups are essential for dividing students into smaller units to collaborate on activities.
- Create Groups: In the Groups section (
Course administration > Users > Groups), click “Create group” and give it a name (e.g., Group 1, Group A, etc.). - Add Members to Groups: Once the group is created, you can manually add students by selecting users from the “Potential members” list and clicking “Add”.
- Groupings (Optional): If you want to organize your groups into larger sets (e.g., by project, section), you can create a “Grouping” and assign groups to it.
4. Set Up Collaborative Activities
Moodle offers several activity types that can foster collaboration:
A. Forums
- Add a Forum: Go to your course page, click “Add an activity or resource,” and select “Forum.”
- Set Up Forum: You can set the forum type to a “Group forum” or “Separate groups” to restrict discussions to specific groups. Set permissions for posting, replying, and viewing topics.
B. Wiki
- Add a Wiki: A Wiki allows collaborative editing of content. Choose “Wiki” under “Add an activity or resource.”
- Group Mode: In the Wiki settings, choose the group mode (Separate groups or Visible groups).
- Configure Editing Permissions: Allow students to collaborate in groups by editing the wiki page.
C. Assignments (Group Assignments)
- Create Group Assignment: If you want students to work collaboratively on assignments, choose “Assignment” when adding a new activity.
- Enable Group Submission: In the assignment settings, enable the “Group submission” option so that one submission per group is allowed. This can be useful for group projects.
- Set Grouping: Under the “Group” setting, select the specific grouping you want to assign to this activity.
D. Google Docs or External Tools Integration
- External Tools: Moodle allows integration with Google Docs, Microsoft Office 365, or other third-party tools. You can add them via the “External Tool” activity.
- Collaborative Work: These integrations allow students to collaborate in real-time within the tools themselves, and work will be automatically reflected in Moodle.
5. Set Up Collaborative Tools for Communication
Communication is key in group work, and Moodle offers several communication tools that support this.
A. Chat
- Create a Chat Room: Add a “Chat” activity if real-time communication is needed.
- Group Chat: You can create a separate chat room for each group in the group settings.
B. Messaging
- Use Moodle’s Messaging System: Students can send messages to each other, and you can allow them to message group members.
C. Collaboration with Peer Reviews (Peer Feedback)
- Enable Peer Review in Assignments: For group work, peer assessment and feedback can be beneficial. In assignment settings, you can enable peer reviews, where students can provide feedback on each other’s work.
6. Monitor and Assess Group Activities
- Track Group Progress: You can track individual and group progress using Moodle’s grading and reporting tools. Go to
Gradebookto see how each group is performing on assignments and other activities. - Manage Group Reports: You can generate reports for group activities. For example, in a forum or assignment, you can review participation, submissions, and interactions within groups.
7. Provide Feedback
- Individual or Group Feedback: Depending on the activity, you can provide feedback either to the whole group or to individual members.
- Peer Feedback: Allow students to assess their peers’ contributions, which can help foster accountability within the group.
8. Facilitate Collaboration with Scheduling and Deadlines
- Set Deadlines for Activities: Clearly specify deadlines for group activities to keep students on track. Use the “Due date” feature in assignments, forums, and other activities.
- Use Moodle Calendar: Encourage students to add group meetings and deadlines to the Moodle calendar to stay organized.
9. Evaluate Group Collaboration (Optional)
Moodle allows you to incorporate collaborative evaluations into your grading system. For example, you can add a “Group Self-Evaluation” activity where each member can rate the contribution of others.
10. Incorporate Group-Based Resources
In addition to activities, you can also upload collaborative resources for groups to work with:
- Shared Folders/Files: Use the “File” or “Folder” resource to create a space where students can upload and share documents within their groups.
- Online Databases: You can also use the “Database” activity to create a collection where group members can add entries.
11. Encourage Participation
To ensure group members actively participate, you can:
- Grade Participation: Set up grading based on group contribution, if desired.
- Use Group Roles: Assign roles within the group (e.g., leader, timekeeper) to ensure shared responsibilities.
By combining these strategies, you can create a collaborative and productive environment in your Moodle course, encouraging students to engage with each other and work together toward shared goals.