
What is eclipse?
Eclipse is a widely used open-source IDE that supports various programming languages, including Java, C++, and Python. Eclipse is a widely used open-source IDE that supports various programming languages, including Java, C++, and Python. It is a popular choice for Java developers. Its primary purpose is to streamline the software development process by providing tools for writing, testing, and debugging code.
What is top use cases of eclipse?
Top Use Cases of Eclipse:
- Java Development: Eclipse is widely used for Java development, offering features like code completion, debugging, and refactoring tools that enhance productivity.
- Web Development: Eclipse supports web development with plugins for HTML, CSS, JavaScript, and frameworks like JavaServer Faces (JSF) and Spring MVC.
- Mobile App Development: Eclipse has plugins for developing mobile applications using platforms like Android and Windows Mobile.
- Database Development: Eclipse provides plugins for connecting to databases, writing SQL queries, and managing database schemas.
- Scientific Computing: Eclipse can be used for scientific computing, with plugins for languages like Python and R.
What are feature of eclipse?
Some key features of Eclipse include:
- Code editing: Eclipse offers syntax highlighting, code completion, and refactoring capabilities to enhance the coding experience.
- Debugging: It provides a debugger that allows developers to step through code, set breakpoints, and inspect variables.
- Build and deployment: Eclipse includes tools for building and deploying applications, helping automate the build process.
- Collaboration: It supports collaboration through features like version control integration and collaborative coding tools.
What is the workflow of eclipse?
Workflow of Eclipse:
- Create a project: The first step is to create a project in Eclipse. This involves selecting the type of project you want to create, such as a Java project or a web project.
- Edit code: Once you have created a project, you can start editing the code. Eclipse provides a variety of tools for editing code, such as a code editor, a debugger, and a compiler.
- Build the project: Once you have finished editing the code, you can build the project. This involves compiling the code into a format that can be executed by the computer.
- Test the project: Once the project has been built, you can test it to make sure it works correctly. Eclipse provides a variety of tools for testing code, such as a unit testing framework.
- Deploy the project: Once the project has been tested, you can deploy it to a production environment. This involves installing the project on a server or other device.
How eclipse Works & Architecture?
Eclipse Architecture
The core of Eclipse’s architecture is the plugin framework, which enables the IDE to be extended with plugins that add new features and functionalities. These plugins are written in Java and packaged as JAR files. When Eclipse starts up, it loads plugins from the plugins directory and integrates them into the IDE. This modular approach makes Eclipse a versatile tool that can be adapted to various development tasks.
Key Components of Eclipse Architecture
- Workspace: The workspace serves as the central repository for all project files and resources. It provides a structured organization for managing and accessing project elements.
- Perspectives: Perspectives are predefined layouts of the Eclipse workbench that tailor the interface to specific development tasks. For instance, the Java perspective prioritizes tools and views relevant to Java development.
- Views: Views are individual windows within the workbench that display specific information or provide interactive tools for development activities. Examples include the Package Explorer, Problem View, and Debug View.
- Editors: Editors are responsible for opening and manipulating files within Eclipse. They provide syntax highlighting, code completion, and other features that facilitate efficient code editing.
- Actions: Actions are commands that can be triggered through menus, toolbars, or keyboard shortcuts. They perform various tasks, such as building projects, launching applications, and refactoring code.
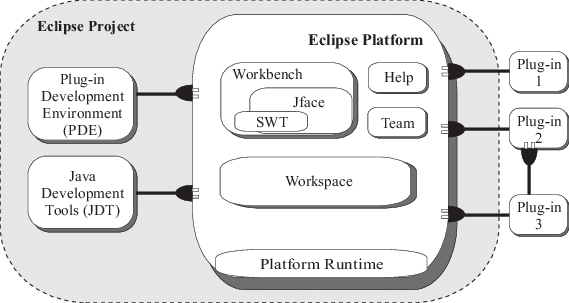
Fig: Eclipse Architecture
The image illustrates the interplay between the core components of Eclipse’s architecture:
- Plugin Framework: Plugins form the foundation of Eclipse’s extensibility. They are loaded and integrated into the IDE, providing new features and functionalities.
- Workbench: The workbench represents the main interface of Eclipse, where developers interact with the IDE’s tools and views.
- Workspace: The workspace acts as the central repository for project files, enabling organized management and access to project resources.
- Perspectives: Perspectives customize the workbench layout to suit specific development tasks, providing a focused and tailored environment.
- Views: Views display specific information or provide interactive tools, enhancing the developer’s productivity and understanding.
- Editors: Editors handle the opening, editing, and manipulation of files within Eclipse, providing syntax highlighting, code completion, and other editing support.
- Actions: Actions represent commands that can be triggered through various means, allowing developers to perform tasks efficiently.
How to Install and Configure eclipse?
Installation and Configuration:
To install Eclipse, you can visit their official website (https://www.eclipse.org) and download the appropriate package for your operating system. After downloading, extract the files and run the executable. Configuration is usually minimal but may involve setting up the compiler, linking external libraries, or installing additional plugins.
Step by Step Tutorials for eclipse for hello world program
Here’s a step-by-step tutorial for creating a “Hello World” program in Eclipse:
Step 1: Install Eclipse
- Visit the official Eclipse website (https://www.eclipse.org/downloads/) and download the appropriate Eclipse package for your operating system.
- Follow the installation instructions provided for your operating system.
- Once the installation is complete, launch Eclipse.
Step 2: Create a new Java project
- Upon launching Eclipse, you’ll see the Welcome screen. Click on the “Create a new Java project” option under the “Quick Access” panel. If you don’t see this option, go to File -> New -> Java Project.
- In the “Project name” field, enter a name for your project (e.g., “HelloWorld”).
- Click “Next” and leave the default settings unchanged for the Java settings.
- Click “Finish” to create the project.
Step 3: Create a new Java class
- In the Package Explorer panel on the left side, right-click on the project you just created (e.g., “HelloWorld”), and select New -> Class.
- In the “Name” field, enter “HelloWorld” and ensure that the “public static void main(String[] args)” option is selected.
- Click “Finish” to create the class.
Step 4: Write the “Hello World” code
- Eclipse will open the newly created “HelloWorld.java” file.
- Inside the “main” method, add the following line of code:
System.out.println(“Hello World!”);
Step 5: Run the program
- To run the program, right-click anywhere within the “HelloWorld.java” file and select Run As -> Java Application.
- Eclipse will execute your program and display “Hello World!” in the Console view at the bottom.
Congratulations! You have successfully created and run a “Hello World” program in Eclipse.