What is flutter?
Flutter is an open-source UI software development kit created by Google. It is used to build natively compiled applications for mobile, web, and desktop from a single codebase. With Flutter, developers can create beautiful and high-performance apps that run on multiple platforms.
Top Use Cases of Flutter
- Cross-platform development: Flutter allows developers to write a single codebase that can be deployed to both Android and iOS devices. This can save a significant amount of time and effort, as developers do not need to maintain separate codebases for each platform.
- Fast development: Flutter’s hot reload feature enables developers to see the changes made in the code immediately on the app, speeding up the development process.
- Beautiful UI: Flutter provides a rich set of customizable widgets that help in creating visually appealing and engaging user interfaces.
- High performance: Flutter apps are compiled to native code, which means that they offer excellent performance on both Android and iOS devices.
Features of Flutter
- Cross-platform development: Flutter allows developers to write code once and run it on multiple platforms, including Android, iOS, macOS, Windows, Linux, and the web. This can save developers a lot of time and effort, as they do not need to write and maintain separate codebases for each platform.
- Hot reload: Hot reload is a feature of Flutter that allows developers to see changes to their code reflected in the running app without having to restart it. This can make development much faster and more efficient.
- Expressive UI: Flutter’s widget-based UI system allows developers to create expressive and interactive UIs. Flutter also provides a rich set of widgets that can be used to build a wide variety of app designs.
- Fast performance: Flutter apps are compiled to native machine code, which provides them with fast performance on all platforms.
- Open source: Flutter is an open source project, which means that it is free to use and distribute. It also has a large and active community of developers who contribute to the project and create new resources and tools.
Workflow of Flutter
- Write code using Dart programming language: Flutter uses the Dart programming language, which is used to write the code for the app’s functionality and UI.
- Build the UI using widgets: Flutter’s UI is built using widgets, which are reusable UI elements. Widgets can be combined and customized to create the desired UI.
- Use hot reload for instant feedback: Flutter’s hot reload feature allows developers to make changes to the code and see the results instantly on the app, speeding up the development process.
- Test the app: Flutter provides tools for testing the app’s functionality and UI, ensuring a high-quality user experience.
- Deploy the app: Once the app is developed and tested, it can be deployed on multiple platforms, including iOS, Android, web, and desktop.
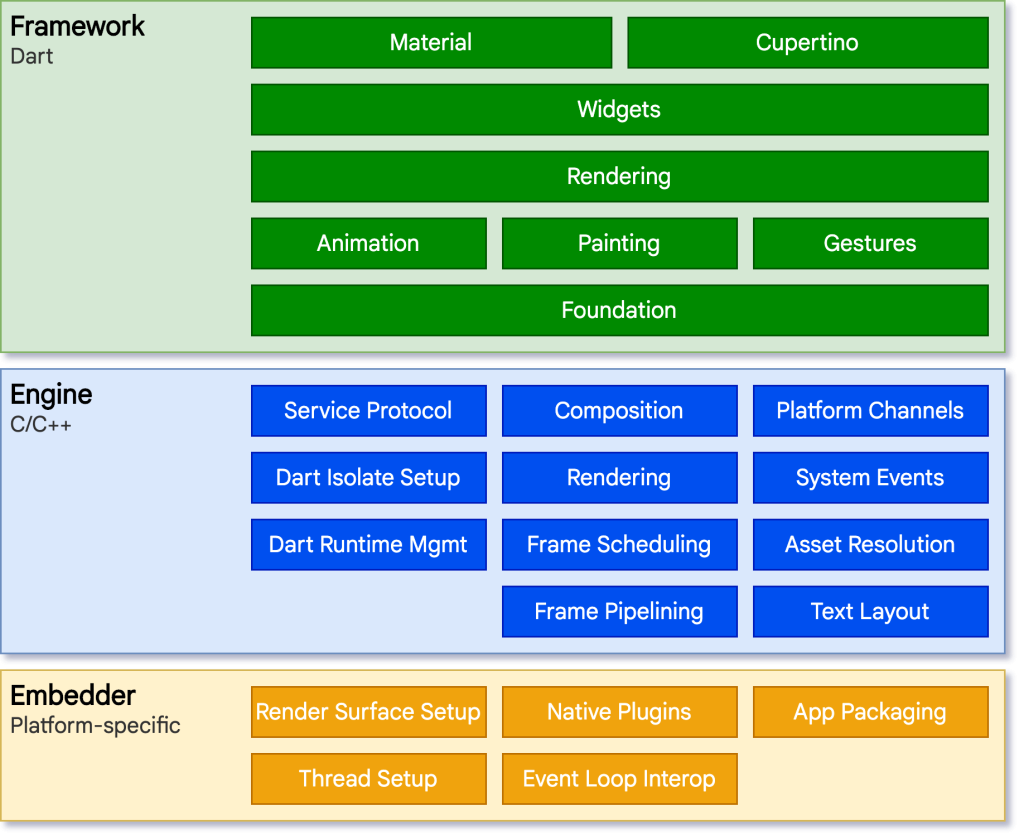
How Flutter Works & Architecture
Flutter is a cross-platform UI development framework created by Google. It uses a single codebase to create native-looking apps for Android, iOS, Web, macOS, Windows, Linux, and Fuchsia.
How Flutter Works
Flutter works by using a layered architecture, which separates the app’s code into different layers, each with its own responsibility. This makes the code more modular and easier to maintain.
The main layers of the Flutter architecture are:
- Framework: The framework provides the basic building blocks for Flutter apps, such as widgets, layout, and rendering.
- Engine: The engine is responsible for communicating with the underlying platform and rendering the UI.
- Dart: Dart is the programming language used to develop Flutter apps. It is a high-level, object-oriented language that is similar to Java and JavaScript.
Architecture
Flutter apps are typically structured using a Model-View-Controller (MVC) architecture. This architecture separates the app’s data (model), user interface (view), and business logic (controller).
The model represents the data that the app is working with. This data could come from a database, a network request, or even just a simple variable.
The view is the user interface of the app. It is responsible for displaying the data from the model and responding to user input.
The controller is responsible for managing the interaction between the model and the view. It handles user input, updates the model, and updates the view based on changes to the model.
Flutter has a number of benefits, including: Cross-platform development, Fast performance, Beautiful UI and Easy to learn etc.
How to Install and Configure Flutter
To install and configure Flutter, you will need to:
- Make sure you have the following system requirements:
- Windows 7 or higher
- macOS 10.13 or higher
- Linux (64-bit)
- Dart 2.13 or higher
- Android Studio or Visual Studio Code
- Download and install the Flutter SDK.
- From the Flutter website, click the Get the Flutter SDK button and download the Flutter SDK for your operating system.
- Extract the downloaded ZIP file to a desired location on your computer.
- Update your PATH environment variable to include the Flutter SDK bin directory.
- Install Android Studio (optional).
- Android Studio is an integrated development environment (IDE) that provides a complete set of tools for developing Android apps. It is not required for Flutter development, but it is recommended.
- To install Android Studio, download the Android Studio installer from the Android Studio website and follow the installation instructions.
- Set up your editor.
- Flutter supports a variety of editors, including Visual Studio Code, Android Studio, and IntelliJ IDEA.
- To set up your editor for Flutter development, install the Flutter plugin for your editor.
- Run
flutter doctorto verify your installation.- This command will check that you have all of the necessary tools installed and configured correctly.
- If you encounter any errors, follow the instructions provided by the command to resolve them.
Once you have completed these steps, you are ready to start developing Flutter apps.
To configure Flutter, you can use the flutter config command. This command allows you to set various configuration options, such as the default device and emulator, the Android Studio directory, and the Dart SDK directory.
For example, to set the default device to a specific Android device, you would use the following command:
flutter config --android-device-id=<device-id>To set the Android Studio directory, you would use the following command:
flutter config --android-studio-dir=<android-studio-dir>Step-by-step tutorials for Flutter for a Hello World program:
Step-by-step tutorials for Flutter for a Hello World program:
- Install Flutter and Dart.
If you don’t have Flutter and Dart installed, you can follow the instructions on the Flutter website: https://flutter.dev/get-started/install.
2. Create a new Flutter project.
Open a terminal window and navigate to the directory where you want to create your project. Then, run the following command:
flutter create hello_worldThis will create a new Flutter project called hello_world.
3. Open the project in your IDE.
Once the project has been created, you can open it in your IDE. Popular IDEs for Flutter development include Android Studio, IntelliJ IDEA, and Visual Studio Code.
4. Edit the main.dart file.
The main.dart file is the entry point for your Flutter app. It contains the code that creates and runs the app’s user interface.
To create a Hello World program, add the following code to the main.dart file:
import 'package:flutter/material.dart';

void main() {
  runApp(MyApp());
}

class MyApp extends StatelessWidget {
  @override
  Widget build(BuildContext context) {
    return MaterialApp(
      home: Scaffold(
        appBar: AppBar(
          title: Text('Hello World!'),
        ),
        body: Center(
          child: Text('Hello World!'),
        ),
      ),
    );
  }
}
This code will create a simple app with a title bar and a text widget in the center of the screen.
5. Run the app.
To run the app, click the run button in your IDE. The app will be launched on a simulator or emulator.
If you are running the app on a physical device, you will need to connect the device to your computer and select it as the run target in your IDE.
6. Congratulations! You have created your first Flutter app.
You can now explore the Flutter documentation and tutorials to learn more about how to develop Flutter apps.