What is Laravel?

Laravel is a free and open-source PHP web framework created by Taylor Otwell. It is designed to make the development of web applications easier and more efficient. Laravel has a large and active community of developers, and is one of the most popular PHP web frameworks in use today.
What are the top use cases of Laravel?
Some of the top use cases of Laravel include:
- E-commerce Websites: Laravel provides excellent support for building feature-rich e-commerce websites. It offers built-in tools for managing products, inventory, orders, and payments.
- Content Management Systems (CMS): Laravel is a popular choice for building CMS platforms. It provides a robust backend for managing content, user roles, permissions, and more.
- Social Networking Platforms: Laravel’s flexible architecture makes it suitable for building social networking platforms. It offers features like user authentication, profile management, activity feeds, and messaging systems.
- Real-time Applications: Laravel can be used to build real-time applications using technologies like WebSockets. It provides seamless integration with tools like Pusher for handling real-time events.
- API Development: Laravel is well-suited for developing APIs. It offers a clean and organized way to define API routes, handle authentication, and process API requests.
What are the features of Laravel?
Features of Laravel:
- Eloquent ORM: Laravel includes an object-relational mapping (ORM) system called Eloquent, which makes it easy to interact with databases.
- Blade templating engine: Laravel also includes a templating engine called Blade, which makes it easy to create and maintain HTML templates.
- Routing: Laravel has a powerful routing system that makes it easy to map URLs to specific controllers and actions.
- Authentication and authorization: Laravel includes a variety of built-in features for authentication and authorization, such as login, registration, and password reset.
- Caching: Laravel includes a caching system that can improve the performance of web applications by storing frequently accessed data in memory.
- Queueing: Laravel also includes a queueing system that can be used to defer tasks until a later time.
What is the workflow of Laravel?
Workflow of Laravel:
- Installation: You start by installing Laravel using Composer, a PHP dependency management tool.
- Routing: Define the routes for your application in the
routes/web.phporroutes/api.phpfile. - Controller: Create controllers to handle HTTP requests and define the application logic.
- Model: Define models to interact with the database using Eloquent ORM.
- Views: Create Blade views to display HTML templates.
- Middleware: Implement middleware for filtering requests.
- Authentication and Authorization: Configure authentication and authorization for your application.
- Database: Use migrations and seeders to manage the database schema and data.
- Testing: Write tests for your application using PHPUnit.
- Deployment: Deploy your Laravel application to a web server.
How Laravel Works & Architecture?
Laravel is a model-view-controller (MVC) framework. This means that Laravel applications are divided into three main components: models, views, and controllers.
- Models: Models represent the data in the application.
- Views: Views are responsible for displaying the data to the user.
- Controllers: Controllers handle user requests and interact with the models to retrieve and update data.
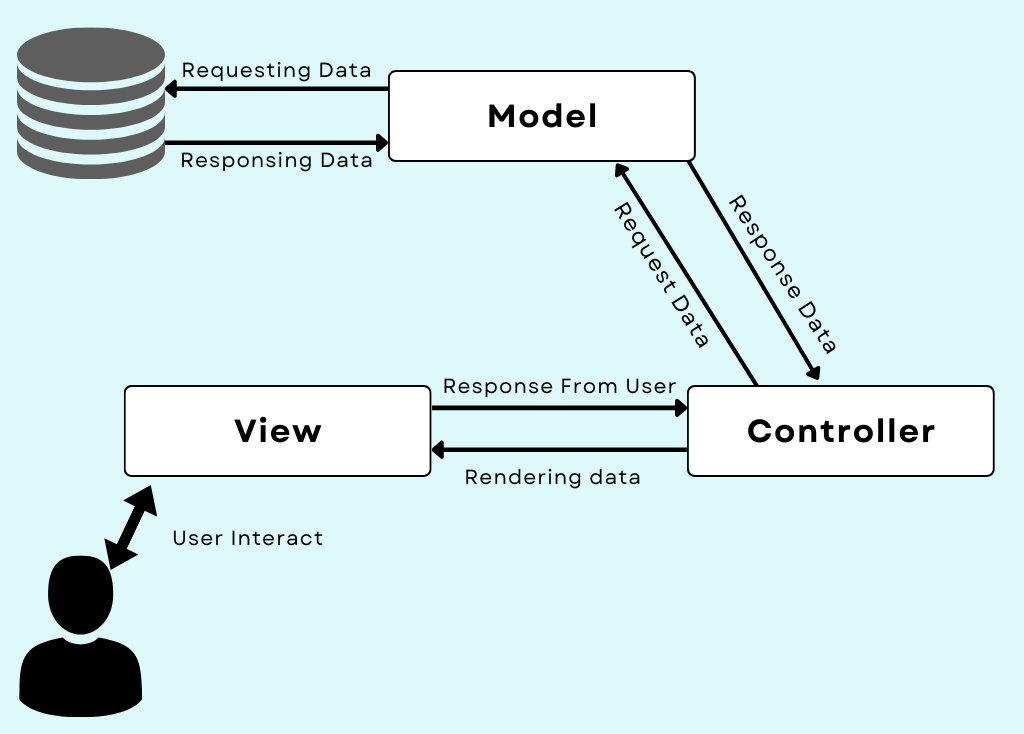
In the image above, we gain insight into how the MVC framework facilitates interactions between the User and the Database.
Model: Within the MVC framework, this element is responsible for managing the data utilized in your application. It handles the retrieval of data from the database, executes the necessary operations, and subsequently stores the modified data back into the database.
In simpler terms, the Model’s role revolves around the management of data exchanged between the database and the User Interface (View).
View: This component constitutes the User Interface, defining the template that is sent as a response to the browser. Within the View, you’ll find the code responsible for presenting data on the user’s browser, encompassing elements like buttons, textboxes, dropdown menus, and various other widgets displayed on the browser screen.
Controller: The Controller component facilitates communication with the Model to fetch data from the database and then relay this data to the View component, ultimately generating the desired output on the user’s browser screen. Similarly, when the user inputs data, the Controller retrieves this information and either performs operations on it or inserts it into the database using the Model components.
Why MVC: MVC is primarily employed to segregate application code into distinct sections for user interfaces, data, and control logic. This separation greatly benefits developers in terms of code maintenance, ultimately streamlining the development process.
How to Install and Configure Laravel?
Here’s a step-by-step guide to installing and configuring Laravel:
Step 1: Install Composer
If you don’t already have Composer installed, you can download and install it by following the instructions on the official Composer website: https://getcomposer.org/download/
After installing Composer, you should be able to run composer from the command line.
Step 2: Install Laravel
Once Composer is installed, you can create a new Laravel project using Composer. Open your terminal or command prompt and run the following command:
composer create-project --prefer-dist laravel/laravel project-name
Replace project-name with the name you want to give your Laravel project.
This command will download and install Laravel and its dependencies. It might take a few minutes to complete.
Step 3: Configure Environment Variables
Laravel uses environment variables for configuration, which are stored in a .env file at the root of your Laravel project. You can copy the example environment file to create your own:
cp .env.example .env
Open the .env file in a text editor and configure your database connection settings, application URL, and any other settings specific to your project.
Step 4: Generate an Application Key
In your terminal, run the following command to generate an application key for your Laravel project:
php artisan key:generate
This key is used for encrypting session and cookie data.
Step 5: Serve Your Application
To run your Laravel application locally, you can use the built-in development server. Navigate to your project’s root directory in the terminal and run:
php artisan serve
This will start the development server, and you’ll see a URL (usually http://127.0.0.1:8000) where your application is being served. You can open this URL in your web browser to access your Laravel application.
That’s it! You’ve successfully installed and configured Laravel.
Step by Step Tutorials for Laravel for the Hello World program
To create a Hello World program in Laravel, follow these steps:
- Create a new controller using the following Artisan command:
php artisan make:controller HelloControllerThis will create a new controller file called HelloController.php in the app/Http/Controllers directory.
- Open the
HelloController.phpfile and add the following code to theindex()method:
public function index()
{
    return view('welcome');
}
This will return the welcome view.
- Create a new view file called
welcome.blade.phpin theresources/viewsdirectory. - Open the
welcome.blade.phpfile and add the following code:
<h1>Hello World!</h1>- Navigate to http://localhost:8000 in your web browser. You should see the message “Hello World!” displayed on the page.
This is a very basic Laravel Hello World program, but it gives you a good starting point for learning Laravel.