Creating and managing user accounts in Moodle is an essential part of maintaining a functional e-learning environment. Here’s a guide on how to do so:
1. Create a New User Account in Moodle
To create user accounts manually, follow these steps:
Step 1: Log in to Moodle as an Admin
- Ensure you have the Administrator role to perform these tasks.
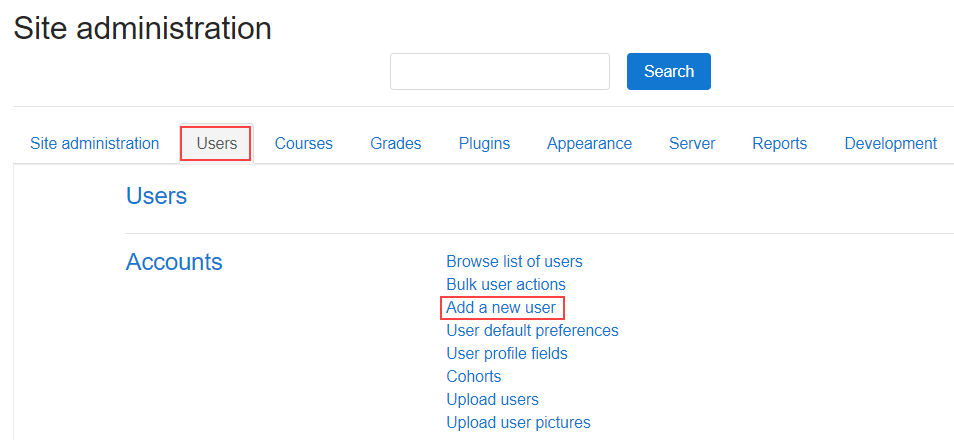
Step 2: Navigate to the User Management Section
- On the Moodle dashboard, go to Site administration > Users > Accounts > Add a new user.
Step 3: Fill Out the User Profile Information
- Username: Choose a unique username for the user.
- Password: Set a password or let Moodle generate one. Ensure that the password is strong.
- First Name: Enter the user’s first name.
- Last Name: Enter the user’s last name.
- Email: Provide the user’s email address. This will be used for notifications and password recovery.
- City and Country: Optional fields.
- Timezone: Choose the user’s timezone.
- Role: The role that the user will have on the site (e.g., student, teacher, manager, etc.).
Step 4: Optional Settings
- Authentication Method: By default, Moodle uses internal authentication, but other methods like LDAP, Google, etc., can be configured.
- Profile Fields: Depending on your Moodle setup, there might be custom profile fields, such as department or organization.
- Picture: You can upload a profile picture if needed.
Step 5: Save the User
- After filling out the form, click Create user to complete the process.
2. Bulk User Creation (CSV Upload)
If you have a large number of users to create, you can upload them in bulk via a CSV file.
Step 1: Prepare a CSV File
- In your CSV file, include the following columns:
- username
- password
- firstname
- lastname
- role (optional)
- course enrolments (optional, to assign users to specific courses)
Step 2: Upload the CSV File
- Go to Site administration > Users > Accounts > Upload users.
- Choose the CSV file to upload and select Upload users.
3. Managing User Accounts
Once accounts are created, managing users includes things like updating their profiles, resetting passwords, assigning roles, or enrolling them in courses.
Step 1: Find and Edit User Profiles
- Navigate to Site administration > Users > Accounts > Browse list of users.
- Use the search bar to find the user by username, email, or other criteria.
- Click the Edit icon next to their name to modify their details, including profile information, roles, etc.
Step 2: Assign or Modify Roles
- To assign or change a user’s role, navigate to their profile, then click Roles in the user’s settings.
- You can assign roles such as Student, Teacher, Manager, etc.
Step 3: Reset User Passwords
- If a user forgets their password, you can reset it manually from the user profile.
- Go to Users > Accounts > Browse list of users, search for the user, and then click Edit.
- Scroll down and click Change password to set a new one.
Step 4: Delete or Suspend Users
- If you need to remove a user, you can delete or suspend their account from the user profile.
- Suspend: The user can no longer log in, but their data is preserved.
- Delete: This will permanently remove the user from the system, along with their data.
4. Assigning Users to Courses
To enroll a user in a course:
Step 1: Navigate to the Course
- Go to the course in which you want to enroll the user.
Step 2: Enroll the User
- Click Participants from the course menu.
- Select Enrol users.
- Search for the user by their name or email.
- Choose the role (e.g., Student, Teacher) and click Enrol users.
5. User Permissions
Moodle allows you to set granular permissions for different roles. You can customize what users can and cannot do by editing roles:
Step 1: Access the Roles Management
- Go to Site administration > Users > Permissions > Define roles.
Step 2: Edit Role Permissions
- Click on a role (e.g., Student, Teacher, Administrator) to edit the permissions for that role.
- You can allow or deny permissions related to course creation, editing content, grading, etc.
6. Monitoring User Activity
To track user activity in Moodle, you can use the following tools:
Reports:
- Activity reports: Go to Reports > Activity reports to view what the user has done in specific courses.
- Logs: Check logs from Site administration > Reports > Logs to see user login history, course activity, etc.
Completion Tracking:
- Moodle allows you to track course completion. Ensure Completion tracking is enabled under the course settings, and you can view when students complete specific activities.
By following these steps, you should be able to effectively create and manage user accounts in Moodle.