Setting up and managing course calendars and events in Moodle is a great way to keep your students on track with deadlines, assignments, and other important events. Here’s a step-by-step guide on how to do this:
1. Access the Course Calendar
To start managing course calendars and events, first ensure that you’re in the course you want to manage.
- Navigate to the course where you want to set up or manage events.
- On the left-hand side or top of the page, look for the Calendar block (if it’s not there, you might need to add it from the course settings).
- If the Calendar block isn’t visible, you can add it by going to “Turn editing on”, then click the Add a block dropdown on the course page, and choose Calendar.
2. Adding Events to the Calendar
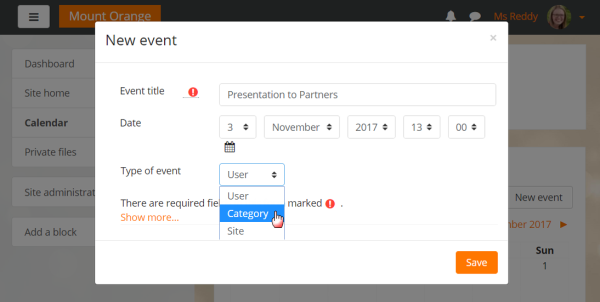
You can add events to your course calendar directly through the calendar interface.
- In the Calendar block (on the course page), click on the date for which you want to add an event.
- A pop-up window will appear. Here you can:
- Select the date and time for the event.
- Name the event (e.g., Assignment due, Midterm exam, etc.).
- Add a description for the event (optional).
- Choose whether this event is for all users in the course or just for you (the teacher).
- If it’s a repeat event, choose whether it should repeat daily, weekly, monthly, or yearly.
3. Managing Events from the Calendar View
You can manage, edit, or delete events directly from the calendar.
- To view events, click on a specific date or navigate through the calendar.
- To edit an event, click on it, and then click Edit. Here you can change the event name, description, date, time, or recurrence.
- To delete an event, simply click on it and select Delete from the pop-up window.
4. Course-Specific Events vs. Personal Events
Moodle lets you create events that are either specific to a course or personal. Here’s the distinction:
- Course events: These are visible to everyone enrolled in the course. When you add an event through the course calendar (as described above), it will appear in the course’s calendar for everyone.
- Personal events: These are events that only you (as the teacher or admin) can see. To add a personal event:
- Click on Add a new event.
- Choose Personal event and fill in the details.
- This event will not be visible to students.
5. Using the “Upcoming Events” Block
To help students stay on track, you can also add an Upcoming Events block to the course page, which displays events coming up in the course calendar.
- Turn on editing mode.
- Add a block (from the Add a block dropdown menu) and select Upcoming Events.
- This block will show students upcoming events based on the course calendar, including deadlines, assessments, and any other events you’ve added.
6. Managing Notifications
You can set up notifications for events and deadlines:
- Go to Profile settings (click on your profile icon at the top right).
- Select Preferences > Notification preferences.
- Here you can configure how you want to receive notifications about course events and deadlines.
- You can enable email notifications for events, assignment due dates, forum posts, and more.
7. Importing Events from Other Sources
You can import events into Moodle using iCal (an external calendar format). This is useful if you want to sync external events (like university-wide deadlines or public events).
- Go to the Calendar page (from the main menu or block).
- On the top-right corner, click on Import and choose iCal format.
- Upload your .ics file, and it will import the events into Moodle.
8. Setting Up Recurring Events
Moodle allows you to create recurring events such as weekly classes or regular deadlines. When creating an event, you can set it to repeat at specific intervals (daily, weekly, monthly, etc.), which will help you avoid adding the same event manually multiple times.
9. Managing Course Activities (Assignments, Quizzes, etc.) with the Calendar
When you create assignments, quizzes, or other activities in Moodle, they automatically appear on the calendar:
- For assignments: Set due dates when creating or editing the assignment. These will be automatically reflected in the calendar.
- For quizzes: Set opening and closing dates when setting up the quiz, which will also appear in the calendar.
10. Using Group-Based Events
If you have different groups in your course (e.g., different tutorial sessions), you can add group-specific events:
- When creating an event, you can select whether the event applies to all participants or specific groups within the course.
Conclusion
By following these steps, you can effectively manage course calendars and events in Moodle, ensuring that your students stay informed and organized. Whether you’re adding assignments, creating reminders, or syncing with external calendars, Moodle provides the tools to help you keep everything running smoothly.