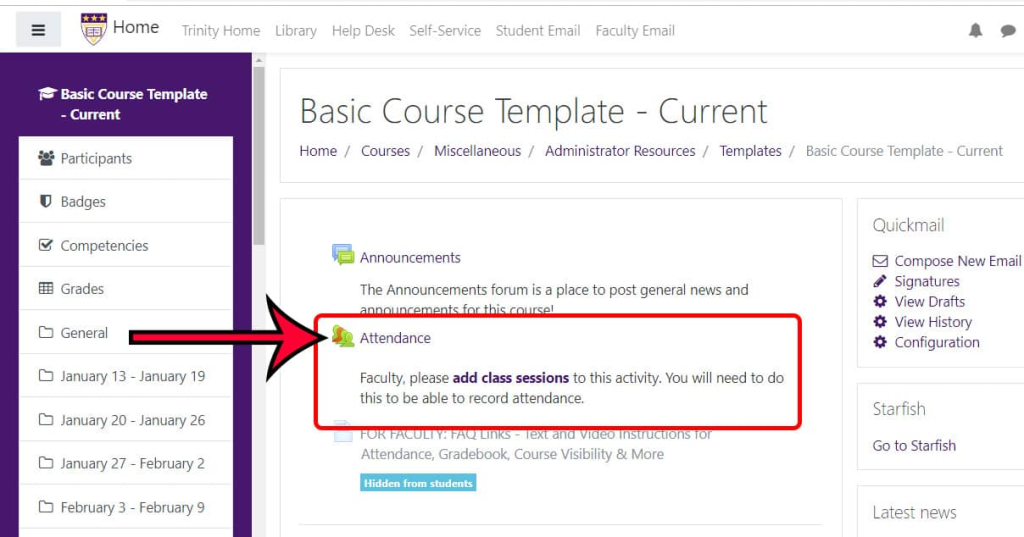
Setting up and managing course attendance tracking in Moodle is a straightforward process. Moodle offers built-in attendance features that allow instructors to track student presence, absence, and participation. Here’s a step-by-step guide to setting it up:
1. Enable Attendance Module (if not already enabled)
Before you can start using the attendance feature, ensure the Attendance module is enabled in your Moodle site. Here’s how to check:
- Log in to Moodle as an administrator.
- Go to Site administration > Plugins > Activity modules.
- Ensure that the Attendance module is listed and enabled. If it isn’t enabled, you can install it via the Moodle plugin directory.
2. Create an Attendance Activity
Once the module is enabled, you can create an attendance activity for your course.
- Go to your course in Moodle.
- Turn editing on (click the “Turn editing on” button).
- In the course section where you want to add the attendance, click Add an activity or resource.
- Select Attendance from the list of activities.
- Click Add to configure the attendance activity.
3. Configure Attendance Settings
When you add the Attendance activity, you’ll be presented with several configuration options:
- Name: Give the attendance activity a name, like “Weekly Attendance” or “Lecture Attendance.”
- Description: Provide a description for the attendance activity (optional).
- Grade: Decide if the attendance will be graded. You can set it to be worth a specific percentage of the overall grade.
- Attendance Type: Choose whether you want a manual attendance recording, automatic attendance based on logins, or a combination of both.
- Allow marking: Decide if you want to allow students to mark their own attendance or if only instructors can mark attendance.
- Session duration: Set the default duration for each session (this can be adjusted for individual sessions later).
Click Save and display to proceed to the next step.
4. Set Up Attendance Sessions
Once the activity is added, you need to create individual sessions for tracking attendance. Here’s how:
- Click on the Attendance activity you just created.
- Under the Sessions tab, click Add session to create a new session.
- For each session, set:
- Session name: For example, “Lecture 1,” “Seminar 1,” etc.
- Date and time: Set the start and end time for the session.
- Attendance status: You can specify different statuses for students (e.g., Present, Absent, Late).
- Repeat session: You can choose to repeat sessions weekly or at any other interval.
Click Save changes once the session is created.
5. Record and Manage Attendance
To take attendance:
- Go to the Attendance activity and select the session you want to manage.
- You’ll see a list of students in the session.
- Click on the Mark Attendance button to mark each student as Present, Absent, Late, or Excused based on their participation.
You can also configure a quick grading option or bulk actions to make the process faster.
6. Use the Reports and Overview
Once students have marked their attendance (or you’ve marked it manually), you can view detailed reports on attendance.
- Go to the Attendance activity.
- Click on the Reports tab.
- You can view attendance for individual students or a summary for the entire class.
- There’s an option to filter attendance by date ranges, status (e.g., absences), or even by specific sessions.
The Statistics option will show you visualizations like attendance trends over time.
7. Set Up Notifications (Optional)
You may want to set up automatic notifications for certain events, like when a student is absent or late. Moodle has a Notification system built-in for administrators, teachers, and students.
- Go to Notifications settings in your Moodle course.
- Choose the types of notifications you want to send out (e.g., automatic attendance reminders or warnings about absences).
8. Integrate with Other Moodle Features (Optional)
If needed, you can integrate the Attendance feature with other Moodle tools, such as:
- Gradebook: Track attendance as part of the grading scheme.
- Calendar: Link your sessions with Moodle’s calendar to help students keep track of attendance.
- Course completion: Use attendance as a criterion for course completion (e.g., if students need to attend a certain number of classes to pass the course).
Tips for Effective Attendance Tracking:
- Custom Statuses: Customize attendance statuses for better tracking, like adding a “Medical Leave” option or “Excused Absence.”
- Bulk Actions: Use bulk actions to mark attendance for groups of students at once (e.g., if a whole class was present or absent).
- Reports: Regularly check the attendance reports to identify patterns of absenteeism and address them early.
By following these steps, you can effectively track and manage attendance in Moodle.