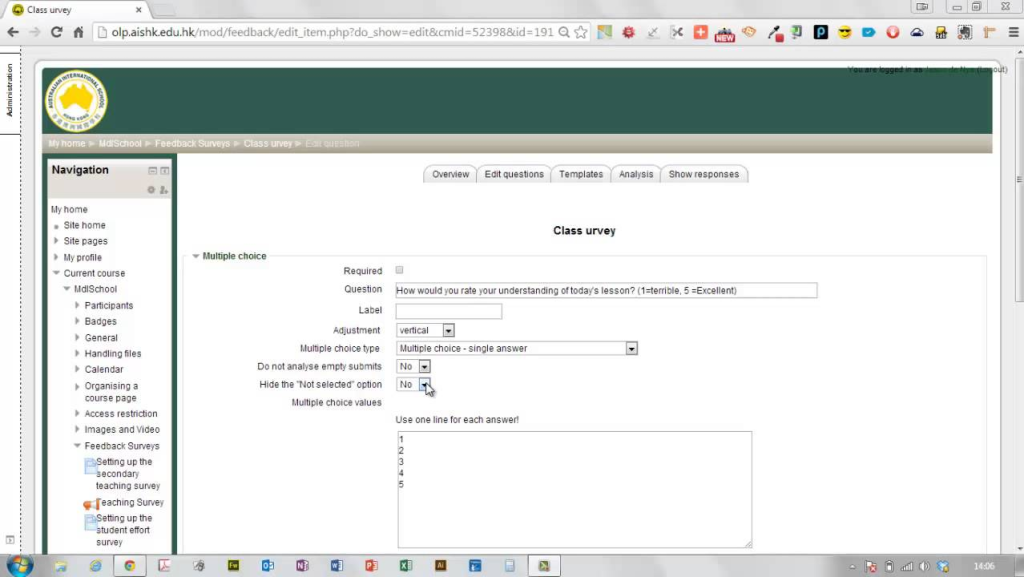
Setting up and managing course surveys and polls in Moodle can be done through various tools and plugins provided by the platform. The main tools for this purpose are Feedback, Survey, and Choice activities. Here’s a step-by-step guide to set up and manage these features:
1. Setting up Surveys in Moodle
Moodle provides a Survey activity that allows you to create predefined survey types. These surveys are mostly used for collecting anonymous feedback from students.
Steps to Create a Survey:
- Log in to Moodle: Log into your Moodle course as a teacher or administrator.
- Turn on Editing: In the course, click the Turn editing on button (usually at the top right).
- Add an Activity:
- Scroll to the section where you want to add the survey.
- Click on the Add an activity or resource link.
- Select Survey from the list of activities and click Add.
- Configure the Survey:
- Survey name: Give the survey a descriptive name (e.g., “Course Feedback”).
- Introduction: Optionally, provide instructions or context for the students.
- Survey type: Moodle offers several predefined survey types like:
- Columbia: Focuses on student perceptions of the course.
- CSEQ: Student Engagement Questionnaire.
- Fleming: A simple feedback survey.
- Custom: You can design your own set of questions.
- Select one that suits your purpose or opt for Custom and create your own questions.
- Additional Settings:
- Allow multiple submissions: Choose whether you want to allow students to fill out the survey more than once.
- Grade: Decide if the survey will contribute to grades (this is optional).
- Availability: Set the opening and closing dates for the survey.
- Limit access: You can restrict access to the survey based on conditions such as groups or user profiles.
- Save Changes: Click Save and display to finalize the survey setup.
- Test the Survey: You can now preview the survey as a student by using the Switch role to… option in the user menu.
2. Setting up Polls in Moodle (Using Choice Activity)
Moodle’s Choice activity can be used to create simple polls or single-question surveys. It allows students to select one option from a list of predefined answers.
Steps to Create a Poll:
- Log in to Moodle: Log into your Moodle course as a teacher or administrator.
- Turn on Editing: Click the Turn editing on button.
- Add an Activity:
- Scroll to the section where you want to add the poll.
- Click on the Add an activity or resource link.
- Choose Choice from the list of activities and click Add.
- Configure the Poll:
- Choice name: Enter the name of the poll (e.g., “Preferred Time for Class”).
- Question text: Write the question you want to ask students (e.g., “What time works best for you?”).
- Allow multiple answers?: Decide whether students can select more than one answer.
- Display options: Choose how you want the poll options to appear (e.g., in a dropdown menu, or as radio buttons).
- Poll options: Enter the available choices for the poll (e.g., different time slots for the class).
- Availability: Set the date range when the poll will be open for responses.
- Grading: You can choose if the responses will be graded or not (most polls are not graded).
- Save and Display: After you configure the poll, click Save and display to finalize it.
- Test the Poll: Preview the poll to make sure it appears as expected.
3. Managing Surveys and Polls
Once surveys or polls are created, managing them involves monitoring responses, analyzing the data, and making necessary changes.
View Responses:
- Go to the Survey or Poll activity in your Moodle course.
- For Surveys: Under the Results section, you can view the results in graphical form or as raw data.
- For Polls: The results can be viewed after students have submitted their responses. You can view it in graphical form or as a list.
Exporting Data:
- You can export survey or poll results into a variety of formats (e.g., CSV, Excel) for further analysis. This can be done from the Results section of the activity.
- For Surveys, there is an option to download the responses directly from the results page.
Modifying the Survey or Poll:
- You can always edit the survey or poll settings by clicking Edit settings from the activity page.
- For surveys, you can also modify the questions if needed, but keep in mind that changes to the questions may affect the responses already collected.
Notifications and Reminders:
- You can set up notifications or reminders for students to complete the survey or poll using the Notifications settings in Moodle.
- You can manually remind students by sending messages or using Moodle’s messaging system.
4. Using Plugins for Enhanced Polling and Survey Features
If you want additional features for surveys and polls, you can explore installing Moodle plugins. Plugins such as Choice-Based Activity or Feedback module can offer extended functionality like:
- Conditional questions in surveys.
- Anonymous feedback options.
- Customizable question types (e.g., Likert scale, multiple-choice).
To install a plugin:
- Go to the Site administration page.
- Navigate to Plugins and then Install plugins.
- Choose the plugin you want and follow the installation instructions.
Tips for Managing Surveys and Polls:
- Keep it short and focused: Make your surveys and polls concise to encourage student participation.
- Ensure anonymity: Ensure anonymity in surveys to get honest feedback.
- Analyze responses: Use the collected data to improve your course, teaching methods, or gather feedback on specific areas.
By following these steps, you can effectively set up and manage surveys and polls in Moodle to gather valuable insights from your students.