Creating and managing course backups in Moodle is an essential part of course maintenance to ensure data is safe and retrievable. Here’s a step-by-step guide to creating and managing backups in Moodle:
1. Creating a Course Backup
Step 1: Log in to Moodle
- Log in to your Moodle site with a user account that has backup permissions (usually admin or teacher).
Step 2: Go to the Course
- Navigate to the course you want to back up.
Step 3: Access Course Administration
- On the course page, click on “Course administration” (usually found in the gear icon in the top right corner).
- Select “Backup” from the dropdown menu.
Step 4: Configure Backup Settings
- You’ll be directed to a backup settings page. Here you can select which elements to include in the backup, such as:
- Activities: Include all activities like quizzes, assignments, forums, etc.
- Blocks: Include blocks such as calendar, upcoming events, etc.
- Filters: Include any content filters used in the course.
- Roles: Include the role assignments (like student, teacher).
- Users: Decide if you want to back up user data (optional).
- You can also choose whether to include the course files or just the course structure.
Step 5: Backup Process
- After selecting the desired settings, click “Next”.
- Moodle will run the backup process and show you a progress screen. If everything is okay, it will allow you to download the backup file, which is typically saved as a
.mbzfile.
Step 6: Download the Backup
- Once the backup process is complete, you’ll be able to download the
.mbzfile, which contains the entire course or the selected elements from the backup.
2. Managing Course Backups
Step 1: Accessing Backup Management
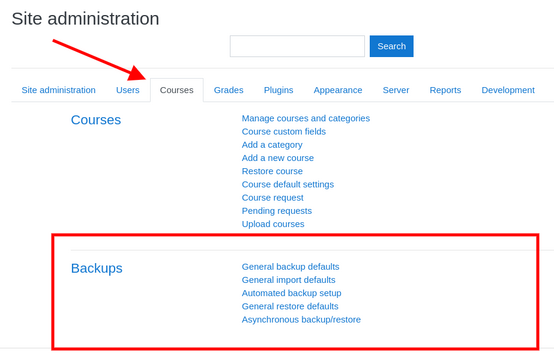
- Go to “Site administration” > “Courses” > “Backups”.
- Here, you can see options for managing backup settings site-wide.
Step 2: Automated Backups (Optional)
- To automate backups for all courses, you can schedule regular backups. To do this:
- Go to “Site administration” > “Courses” > “Backups” > “Automated backups”.
- You can specify the frequency (daily, weekly, etc.) and other settings, such as which courses to back up and where to store backup files.
Step 3: Reviewing Existing Backups
- You can access and manage previous backups from the “Backup” section of the course settings. This allows you to:
- Restore a previous backup.
- Download backups for storage.
- Delete older backups.
Step 4: Restoring a Backup
- To restore a course from a backup:
- Navigate to the course you want to restore to (you can create a new empty course for the restore).
- Go to “Course administration” > “Restore”.
- Upload the
.mbzbackup file. - Select the restore options (whether to merge with the existing course or overwrite it).
- Complete the restore process by clicking “Continue”.
Step 5: Storing Backups Safely
- Backups should be stored in a safe location (preferably off-site or in the cloud) in case of data loss.
- If backups are stored on the server, make sure to regularly delete outdated ones to save space.
3. Best Practices for Course Backup Management
- Regular Backups: Set up automated backups, especially for important courses, to ensure that you have up-to-date versions saved.
- Backup Retention: Keep a rolling history of backups but periodically clean up old backups to save storage space.
- Backup Integrity: Periodically restore a backup to test its integrity and ensure that it works as expected.
- Off-site Backup: Always store backups in multiple locations (local server, cloud storage, etc.) to prevent data loss in case of server failure.
By regularly backing up and managing these backups, you ensure that your course data remains secure and recoverable if needed.