Setting up and managing course badges and certifications in Moodle is a great way to incentivize learners and acknowledge their achievements. Below is a guide to help you set up badges and certifications in Moodle.
1. Setting Up Course Badges in Moodle
Step 1: Enable Badges in Moodle
- Login to your Moodle site as an administrator.
- Go to Site administration > Advanced features.
- Ensure that Badges is set to “Yes” in the settings. This will enable badges functionality on the site.
Step 2: Create a Badge
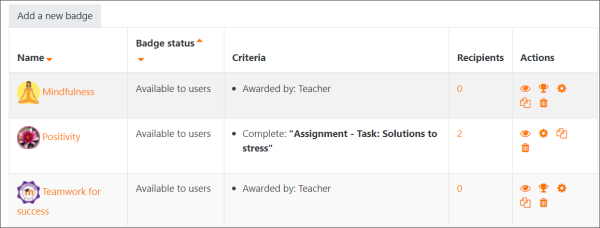
- Go to the course where you want to add badges.
- In the Course administration menu, click on Badges > Manage badges.
- Click on Add a new badge.
- Fill in the details for your badge:
- Name: Give your badge a clear and recognizable name.
- Description: Include a short description of what the badge represents.
- Badge image: Upload an image for the badge, which will be displayed when awarded.
- Criteria: Set the conditions that must be met to earn the badge (e.g., completing a quiz, posting on forums, achieving a certain grade, etc.).
- Issuance options: Choose whether the badge is awarded manually or automatically.
- Automatic issue: The badge is awarded when the user meets the defined criteria.
- Manual issue: You need to award the badge manually, even if the criteria are met.
- After setting the necessary details, save changes to create the badge.
Step 3: Set Badge Criteria
- In the Badge settings, you can define the criteria for earning the badge:
- Activity completion: The badge is awarded when a specific activity is completed (e.g., completing a quiz or viewing a resource).
- Grade-based: Award the badge when a user achieves a specific grade or score in an activity.
- Manual awarding: The instructor or administrator can award the badge manually when the learner meets the required conditions.
Step 4: Displaying Badges
- You can display badges in the course or the learner’s profile. Instruct learners to check their Badges in their profile to view all earned badges.
2. Setting Up Course Certificates in Moodle
To issue certificates to students upon completing a course or meeting specific requirements, you will need to install the Certificate module if it’s not already enabled.
Step 1: Install the Certificate Plugin
- Go to Site administration > Plugins > Install plugins.
- Download and install the Certificate plugin if it’s not already installed. This plugin allows you to generate and issue certificates.
Step 2: Add the Certificate Activity to the Course
- In your course, turn editing on.
- Click Add an activity or resource and select Certificate.
- Configure the certificate settings:
- Certificate name: Choose a name for the certificate.
- Course completion criteria: Select the conditions under which the certificate will be issued (e.g., completing the course, achieving a certain grade, etc.).
- Appearance: Design your certificate, including adding text, images, and variables like the learner’s name or course name.
Step 3: Set Up Certificate Settings
- In the Certificate settings, you can personalize it with:
- Custom text: Include text such as the course name, learner name, or completion date.
- Variables: Use special Moodle variables to personalize the certificate, e.g.,
{{username}},{{coursename}},{{completiondate}}, etc. - Certificate design: You can upload a custom certificate background image or use the default template.
- Configure completion settings to determine when the certificate is issued. For example, you can set it so that the certificate is only issued when a learner reaches a certain grade or completes all the activities in the course.
Step 4: Issue Certificates
- Once the conditions are met, the learner will automatically receive the certificate, or you can manually issue it based on course progress.
- Learners can then download their certificate from the Certificates section of the course.
3. Managing and Tracking Badges and Certificates
- Tracking Badges: You can track all the badges awarded in your course through the Badges management interface. There, you can see who has earned which badge and the criteria they met to earn it.
- Tracking Certificates: For certificates, you can also see who has been issued a certificate and the date they received it. This can be done through the course or via the site administration panel.
- Revoke or Reset Badges/Certificates:
- If necessary, you can revoke or reset a badge manually by navigating to the Badges section in Course administration.
- For certificates, you can go to the Certificate activity and reset or revoke issued certificates if required.
4. Additional Tips
- Use Gradebook: Integrate badges and certificates with the Gradebook to create a more advanced tracking system for your learners.
- Awarding Multiple Badges: You can set up multiple badges in a course to be awarded for different milestones.
- Personalization: Personalize badges and certificates by using variables such as the student’s name or course information for a more engaging learning experience.