Setting up and managing course enrollment keys in Moodle is a straightforward process. Enrollment keys are used to restrict access to your courses and ensure that only those with the correct key can enroll. Here’s a step-by-step guide to set them up and manage them:
1. Enable Enrollment Key for a Course
- Log in to Moodle: Log in to your Moodle site with your administrator or teacher credentials.
- Go to the Course:
- Navigate to the course where you want to add an enrollment key.
- Edit Course Settings:
- On the course page, click on the “Gear icon” (Settings) in the top-right corner.
- Select “Edit settings”.
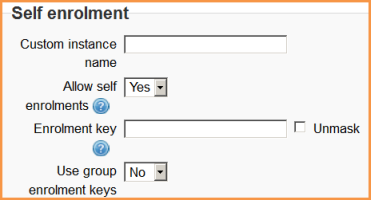
- Set the Enrollment Key:
- Scroll down to the “Enrollment methods” section.
- Find the “Self enrollment (Student)” option and click on Edit Settings or Add Method if it’s not already enabled.
- In the “Enrollment key” field, enter a key (this can be any word or phrase you want to use).
- For example, “Moodle2025”.
- Click Save changes at the bottom of the page.
2. Managing the Enrollment Key
You can manage the enrollment key by performing the following steps:
- Change the Key:
- To change the key later, go to the course’s “Edit settings” page again.
- Scroll down to the “Enrollment methods” section and click Edit settings next to Self enrollment.
- Modify the “Enrollment key” and click Save changes.
- Disable the Enrollment Key:
- If you no longer want to require an enrollment key, go to the “Enrollment methods” section in the course settings.
- Click Disable next to Self enrollment or remove the enrollment method entirely.
- Allow Multiple Enrollment Methods:
- You can enable multiple enrollment methods (like manual enrollment, guest access, etc.) along with the enrollment key.
- Each method can be configured with different settings.
3. Communicating the Enrollment Key to Students
- Once the enrollment key is set, you’ll need to inform your students about it. This can be done by:
- Sending an email with the key.
- Posting the key in your course announcement or communication tool within Moodle.
4. Monitoring Enrolled Users
- After students enter the course, you can monitor who has enrolled with the key by checking the list of enrolled users.
- Go to Participants in the course.
- View a list of enrolled students and manage their enrollment as needed.
5. Advanced Key Management (Optional)
- Expiration: Set an expiration date for the enrollment key (if applicable) under the Self-enrollment settings.
- Limit the number of users: You can also limit the number of users who can use the enrollment key by setting a limit in the settings.
This setup allows you to control who can access your course based on the enrollment key. It’s useful for private or special access courses.